
A leak that returns is telling you something specific: the last repair treated what was visible instead of where water actually enters the building. When the same ceiling stain reappears in the same unit two storms after a repair, nobody has found the entry point yet.
For a manager or owner responsible for a Texas condo, apartment community, or mid-rise, that distinction is the entire budget conversation. Another patch every spring, or one correctly diagnosed detail rebuilt once.
This guide is written for Texas HOA boards, condominium associations, multifamily owners, property managers, and professionals managing recurring water intrusion, not just isolated residential shingle repairs.
For portfolio-scale problems, Shepperd’s multifamily reconstruction services can be considered when recurring water intrusion extends beyond a single roof repair.
If Water Is Entering Now
- Protect residents, contents, and electrical fixtures.
- Photograph the ceiling, walls, flooring, and visible exterior conditions.
- Record the date, rainfall, wind direction, and location.
- Notify the HOA, property manager, owner, and insurer as appropriate.
- Avoid covering the suspected entry point with sealant before investigation.
- Arrange a professional inspection if the leak returns or affects multiple areas.
Why Your Roof Leak Keeps Coming Back After Repair
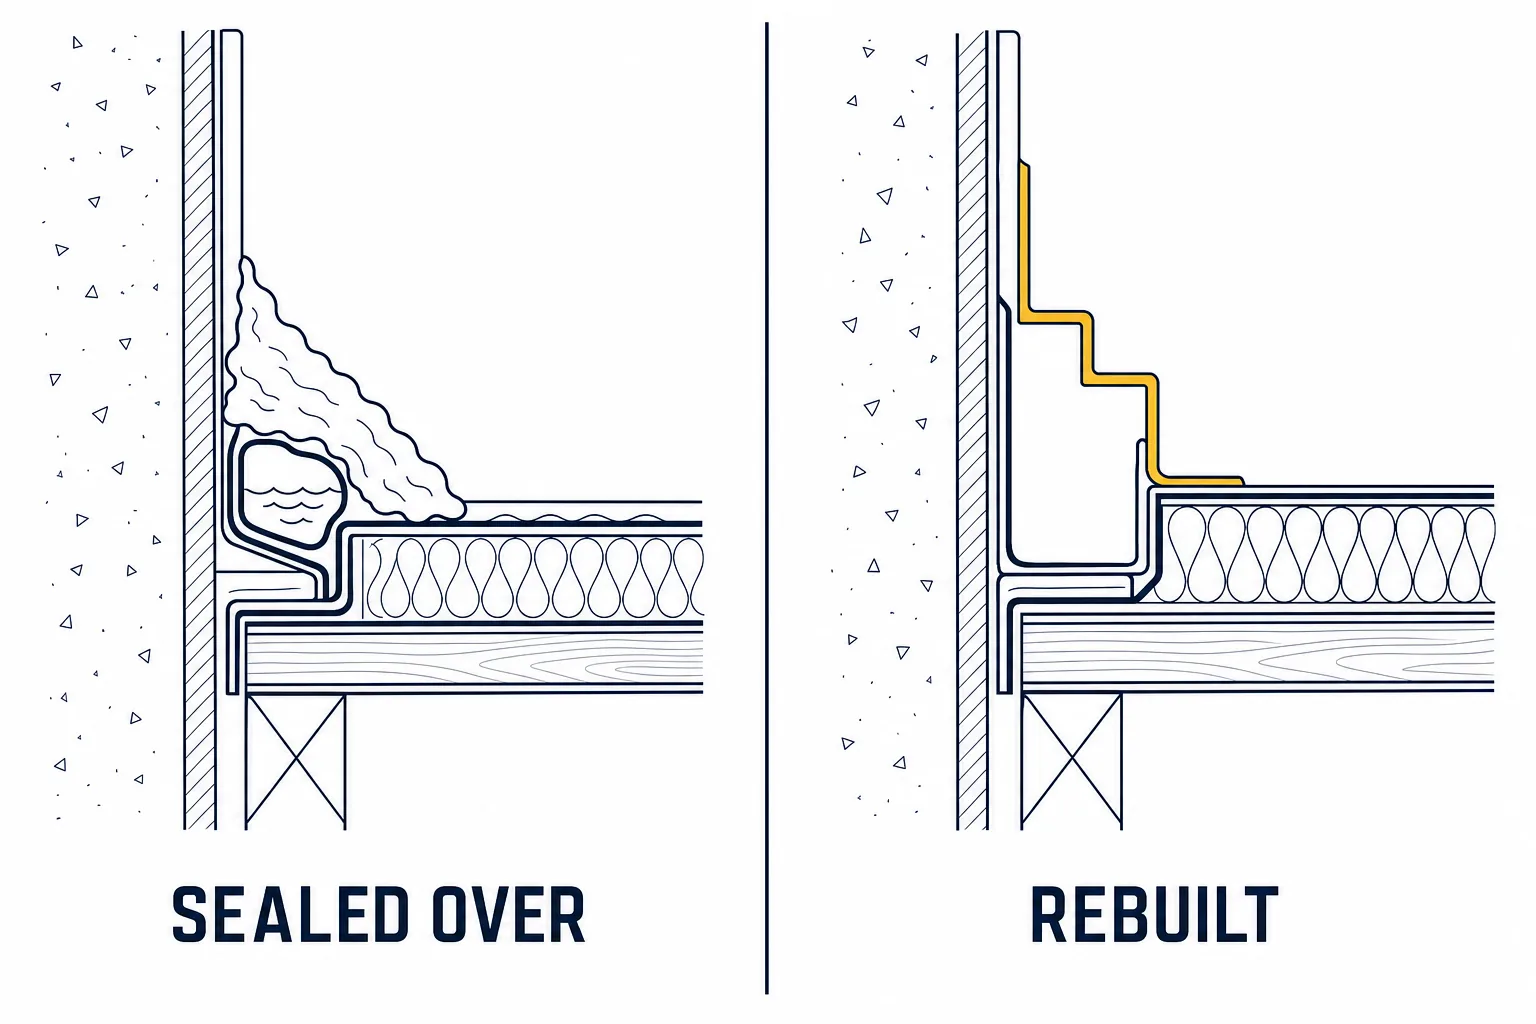
Almost every repeat leak falls into one of three categories.
Wrong location diagnosed. The repair was made where water appeared, not where it entered. This is a frequent reason repeat leaks continue, and it is why a roof can be repaired three times and still leak.
Right location, wrong method. Someone found the failed pipe boot or the open flashing joint and covered it with sealant, mastic, or roof cement. That may provide temporary protection, but a coating can conceal the failed detail and leave moisture within the assembly if the underlying condition is not corrected.
Right repair on an assembly past its serviceable life. If the membrane has shrunk at the perimeter or the shingles are brittle and shedding granules, working on one area breaks the material around it and seeds the next leak.
Related readingBalcony Failure & HOA Reconstruction Cost GuideRead the guide →Sealant is a maintenance material. It is not flashing, and it does not replace flashing.
If the last three invoices on a building all describe caulking, patching, or coating, the entry point has probably never been identified.
Leaks in your roof do not just go away. Have someone come take a look, and do it before your rustic ceiling starts to show the water damage.Read on Reddit ↗
Why the Interior Stain Is Rarely the Leak Source
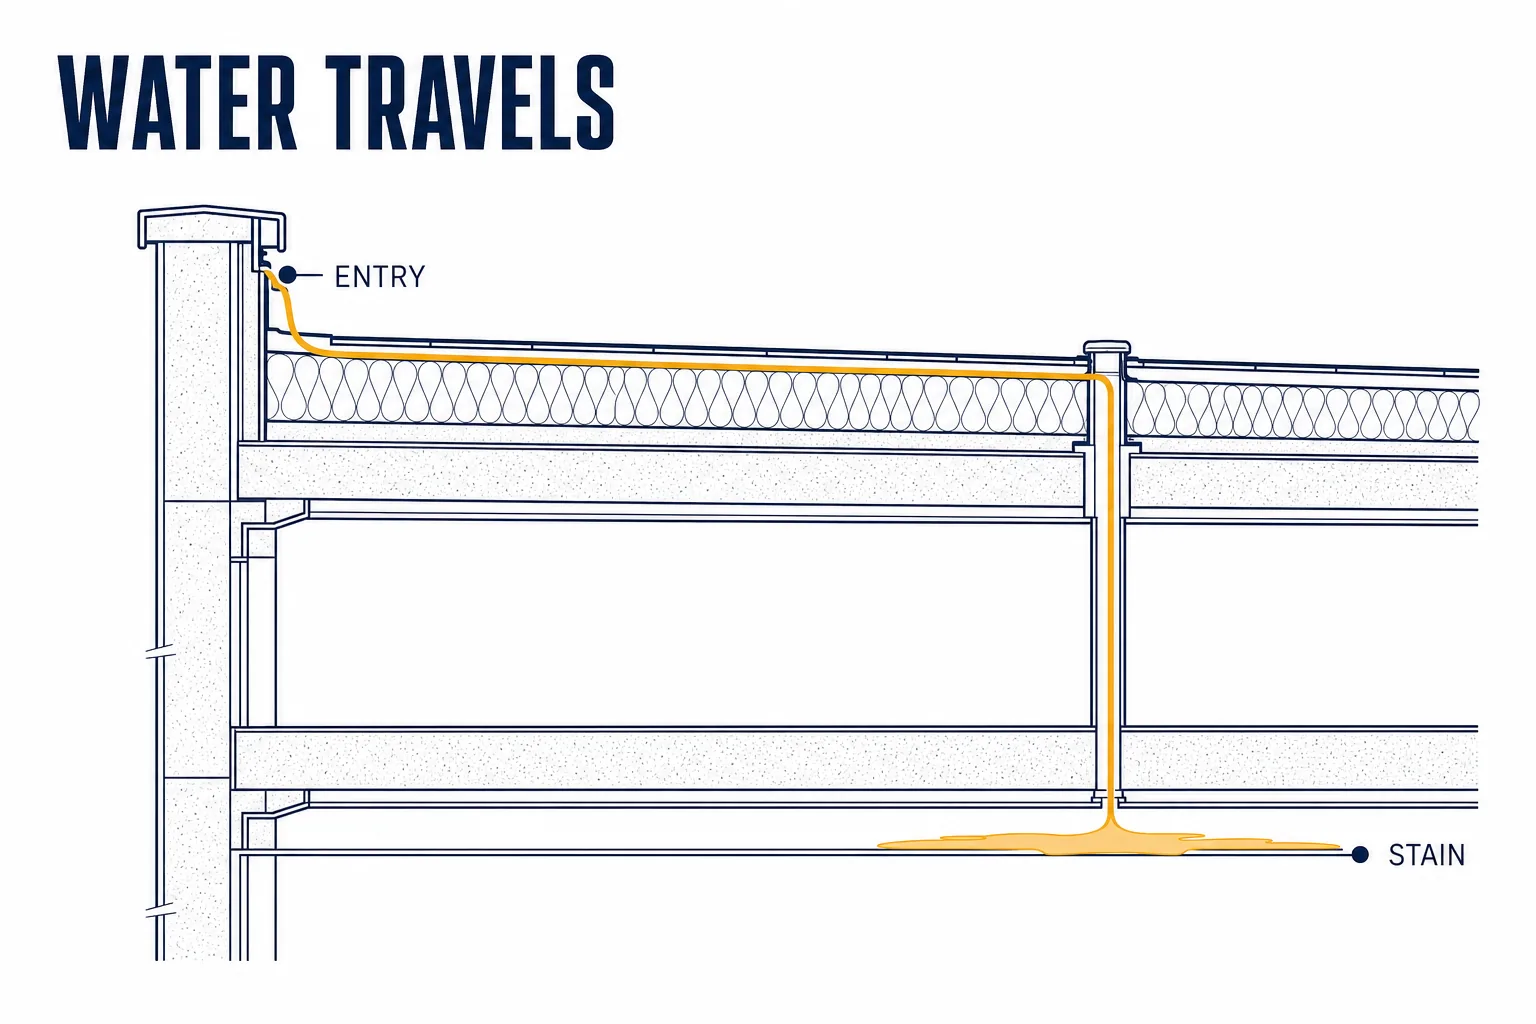
Water rarely falls straight down. It enters high, then runs laterally along underlayment laps, deck seams, rafters, purlins, conduit, and top plates until it finds a fastener hole, a seam, or a light fixture to drop through.
On low-slope multifamily and commercial roofs, water gets between the membrane and the insulation and migrates a long way before it surfaces at the lowest available penetration. A third-floor ceiling stain can originate at a parapet coping joint, a wall-to-roof transition, or a mechanical curb thirty feet away.
Absorbent materials add a delay. Saturated insulation and gypsum hold water, so the drip a resident reports today may be from a storm two days ago. That delay is why residents, and sometimes crews, stop connecting the leak to the weather that caused it.
The practical rule: never scope a roof repair off interior evidence alone. The interior tells you where water exits and almost nothing about where it entered.
| What you see | Possible source to investigate |
|---|---|
| Ceiling stain below a roof edge | Flashing, gutter overflow, or wall transition |
| Leak only during wind-driven rain | Windward wall, parapet, window, or penetration |
| Leak several days after rainfall | Saturated insulation or concealed water migration |
| Leak during dry weather | Plumbing, HVAC condensation, or stored moisture |
| Repeat leak near a rooftop unit | Curb flashing, drain, condensate, or membrane termination |
| Multiple units affected vertically | Shared wall, penetration, plumbing stack, or roof detail |
Roof and Building Details That Commonly Cause Repeat Leaks
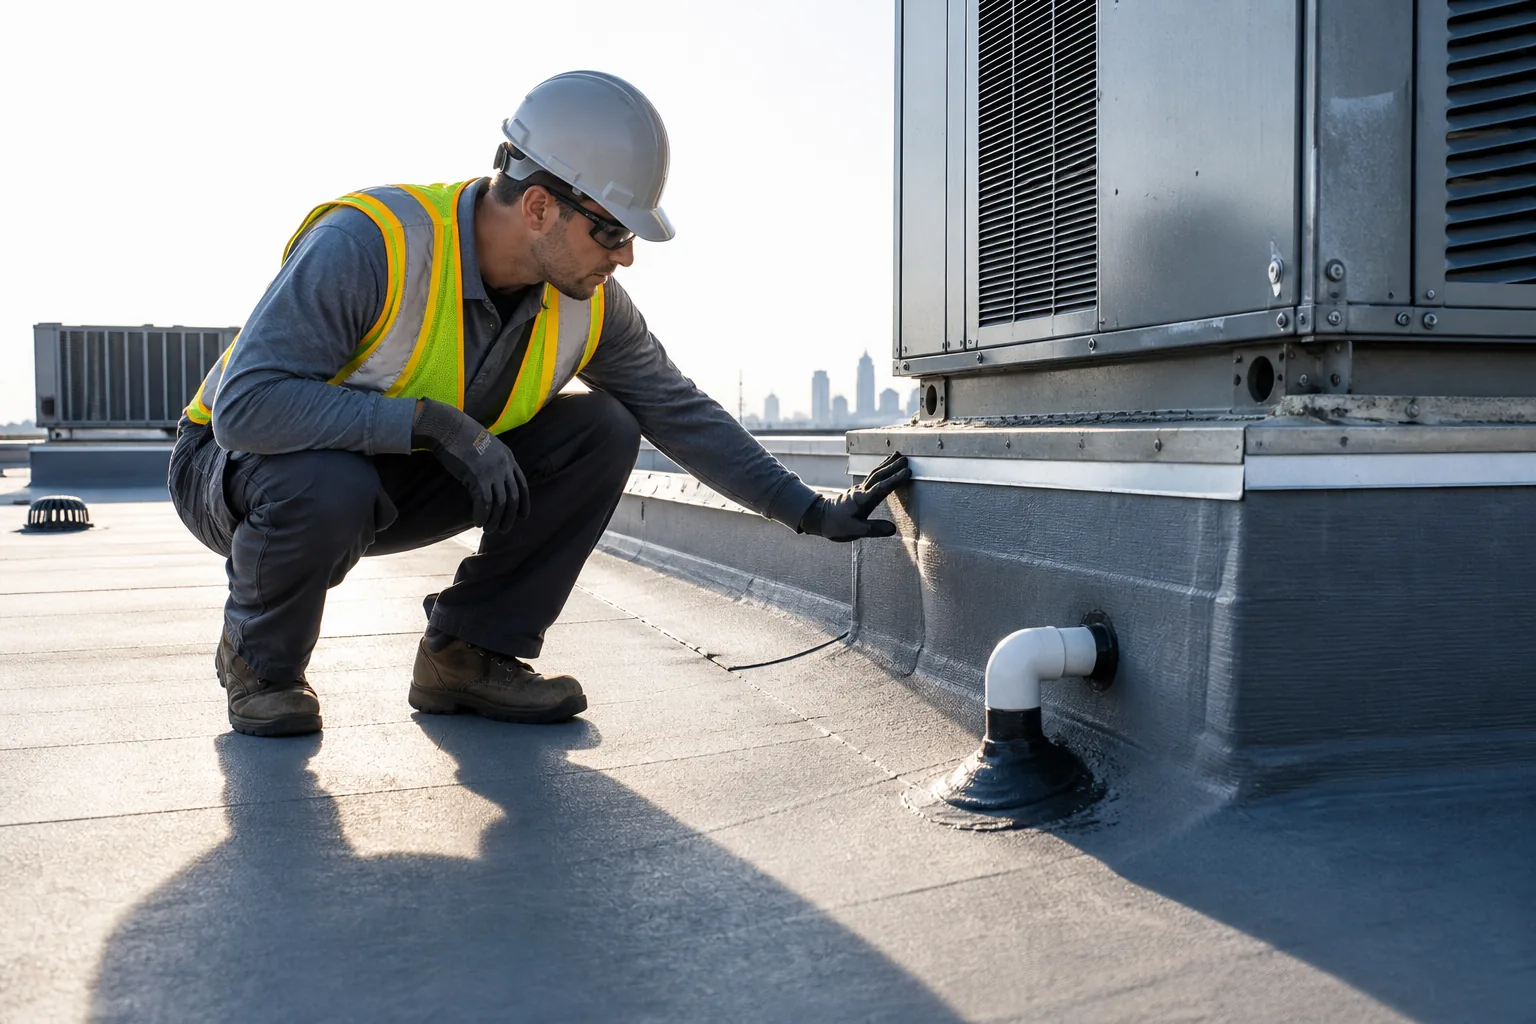
Across repeat-leak investigations, the same conditions keep turning out to be the true source.
Penetrations: Pipe Boots, Vents, Curbs, and Fasteners
Cracked, UV-degraded pipe boots are among the most common sources on steep-slope roofs, and they fail well before the shingles do. On low-slope roofs, HVAC curbs, condensate lines, and anything added after original construction (satellite mounts, solar racking, antenna bases, new exhaust penetrations) are frequently unflashed or flashed with sealant only.
On metal roofs and mechanically attached membranes, backed-out fasteners open pinhole paths that leak only under certain conditions. The correct fix is replacement of the flashing component, not another bead over it.
Flashing and Transitions: Parapets, Walls, Chimneys, Skylights
On condo and mid-rise buildings, counterflashing, through-wall flashing, and coping joints at parapets are the usual culprits. Two conditions come up constantly. Missing kick-out flashing where a roof edge meets a wall quietly dumps water into the wall cavity and presents as a stain a floor below.
Reverse-lapped flashing looks finished from the ground and leaks every storm. Transitions between dissimilar materials also move at different rates with temperature, so joints that were tight at installation open over time.
Valleys, Seams, and Membrane Terminations
On steep-slope roofs, open or short-lapped valleys concentrate the most water on the roof at the weakest detail. On single-ply, unwelded or fishmouthed field seams and terminations at drains, scuppers, and edge metal carry the highest stress and fail first. Probing field seams with a blunt tool is a fast, low-cost diagnostic step that gets skipped surprisingly often.
Drainage: Clogged Drains, Ponding, and Overflow
Standing water finds every marginal seam and accelerates membrane breakdown. Blocked internal drains back water above flashing height, at which point details never designed to be submerged are asked to behave like a bathtub liner.
Overflow protection matters here: where roof drains are required, the International Building Code requires secondary (emergency overflow) drains or scuppers where the roof perimeter would entrap water if the primary drains are blocked, which is exactly the parapet condition on most multifamily buildings.
Check gutters and downspouts too. Overflow behind fascia produces interior staining that looks identical to a roof leak. Decks deflect, and rooftop equipment gets added, so a roof that drained correctly in year one can hold water in year twelve.
Aged or Wrong Materials for the Slope
Granule loss, thermal splitting, and membrane shrinkage pulling at perimeters and curbs all signal an assembly at the end of its serviceable life, where repair work damages the surrounding field. Separately, steep-slope products installed on low-slope areas (common at porch roofs, walkway covers, and additions) fail at the laps no matter how well they were installed. When the original detailing was wrong, it is usually wrong at every similar condition across the building. That is a very different problem than one bad repair.
When the Leak Is Coming From the Building Envelope
A meaningful share of roof leaks are not roof leaks. The Asphalt Roofing Manufacturers Association roof-system guide is useful background for understanding how shingles, underlayment, flashing, and ventilation function together.
- Wind-driven rain at windows, doors, failed sealant joints, and wall control joints.
- Balcony and walkway decks, guardrail posts penetrating waterproofing, and stair landings above occupied space.
- Coping caps, stucco and EIFS terminations, and gaps in through-wall flashing.
- Condensation on ducts, uninsulated lines, and cold surfaces in attics and plenums, plus plumbing failures and HVAC condensate pan overflows.
That last group answers a question owners ask constantly: why is the ceiling wet when it has not rained? If water appears in dry weather, suspect condensation, plumbing, or mechanical equipment before the roof, and check whether the timing tracks with HVAC operation rather than weather.
Why the Leak Shows Up Some Storms and Not Others
Intermittent leaks feel random. They are not.
Wind direction and pressure differential decide which elevation actually receives driven water, so a detail on the south face may only leak during storms from the south. Rain duration and intensity matter more than total rainfall, because a saturation threshold has to be reached before water travels through the assembly.
Thermal cycling opens and closes joints, so the same condition leaks in February and stays tight in October. Absorbent assemblies delay the appearance and break the mental link between storm and stain. Hail-bruised material can leak intermittently long before damage is obvious from the ground.
Log the conditions of each occurrence. The pattern is diagnostic evidence.
How Professionals Investigate a Recurring Roof Leak
A defensible investigation moves in order: documentation, observation, instrumentation, controlled testing, then selective openings. Each step narrows the field before anyone spends money on the next one. This sequence is not an in-house invention. ASTM publishes a guide for evaluating water leakage of building walls that describes methods for determining and evaluating causes of water leakage of exterior walls through a staged review of documents, service history, inspection, and testing.
Step 1: Build the Leak History First
Log unit numbers, elevations, dates, wind direction, rain duration, and photographs for every reported occurrence, then map the reports on both a floor plan and a roof plan. Patterns emerge fast in multifamily and condo buildings. Leaks stacked vertically point to a wall or penetration path. Leaks clustered along one elevation point to wind-driven rain. Leaks around one curb point to that curb.
Pull prior repair invoices and scopes so the same failed fix is not purchased twice. Property managers own this step, and doing it well shortens everything that follows.
Step 2: Inspect the Underside, Not Just the Surface
Get into the attic, plenum, or deck underside and trace staining upslope to the highest wet point. Look for rusted fasteners, delaminated sheathing, daylight at penetrations, and growth patterns that indicate a long-term wet path rather than a single event. Then walk the exterior and photograph every penetration, transition, and termination, keyed to the roof plan. Two views of the same assembly, inside and outside, eliminate most false leads.
Step 3: Moisture Survey and Nondestructive Scanning
Infrared thermography and capacitance meters map wet insulation across a low-slope roof without cutting it open. Infrared has an established methodology behind it: ASTM publishes a standard practice for locating wet insulation in roofing systems using infrared imaging.
The extent and distribution of wet insulation can help the owner and design team compare targeted repair with broader replacement, but the decision should be based on the survey findings, assembly condition, repairability, code requirements, and project economics. A survey marked on a roof plan gives the owner or board a clearer basis for evaluating scope and cost.
Step 4: Controlled Water Testing, Bottom Up
Start at the lowest suspected condition and work up, isolating one detail at a time, with an observer stationed inside and a stopwatch running. When the leak reproduces, stop. You have your entry point.
Hosing an entire roof proves nothing, because once water is everywhere you cannot attribute the result. For windows, curtain wall, and glazing, recognized field methods exist, including ASTM E1105, the field test method for water penetration of installed exterior windows, skylights, doors, and curtain walls under uniform or cyclic static air pressure difference. Repeatable method, repeatable answer. This step separates diagnosis from guessing.
Step 5: Investigative Openings and Documentation
Selective demolition at the confirmed condition exposes what the surface hides: reverse laps, missing or terminated flashing, rotted blocking, saturated sheathing, corroded fasteners. Photograph and measure everything before anything is closed up, and record materials as found.
Openings also produce an accurate cost of repair rather than an allowance-driven guess, which matters when a board has to approve a number. This is where our work typically sits: performing investigative testing and cost-of-repair scoping alongside the forensic engineer or consultant, gathering conditions and data while engineering conclusions stay with the engineer.
Is It an Isolated Leak or a Systemic Envelope Problem?
Systemic signals: the same detail failing at multiple locations, leaks across several elevations or unit stacks, or failures well ahead of the assembly’s expected service life.
Isolated signals: a single penetration, storm-specific damage in one area, or one previously repaired spot.
That distinction affects the investigation, budget, sequencing, and approval process. A systemic pattern may move the conversation from isolated repair to commercial property reconstruction and planned capital work. Repeated patches, interior repairs, and resident disruption can ultimately cost more than correcting the underlying condition through a properly defined scope.
How Quickly Should a Recurring Roof Leak Be Investigated?
Stabilize immediately, investigate within days, and never let an active leak ride through a season.
The progression is predictable. Saturated insulation loses R-value and stops drying. Sheathing and framing decay. Fasteners corrode, and pull-out values drop. Finishes, contents, and resident property get damaged.
Persistent moisture can contribute to microbial growth and additional interior damage, particularly when wet materials are not dried promptly. At that point, roof repair may also require interior reconstruction and occupant coordination.
Stabilize with measures that do not compromise later diagnosis: interior containment, temporary tarping clear of the suspected detail, and drying equipment. Do not bury the suspect area under sealant before anyone has looked at it. Layers of patching over an unresolved detail make it much harder to establish what actually failed.
Who Handles a Roof Leak in a Condo or HOA Building?
This is general information, not legal advice. The association’s attorney and insurer are the right parties for responsibility and coverage questions.
As a framework, the governing documents control. The declaration, CC&Rs, and bylaws define what a common element is, what is a limited common element, and what belongs to the unit. Roofs are typically a common element maintained by the association, which is why the answer to whether the HOA covers roof leaks usually starts with the roof itself being the association’s responsibility, while interior finishes and personal property often fall to the unit owner and the owner’s policy.
Limited common elements such as balconies and patio decks are the usual gray area, and they are also a frequent leak source, which is exactly why they generate disputes.
For a manager handling a leak in a condo or apartment ceiling: read the declaration first, document the source thoroughly, and get the entry point identified before the responsibility conversation starts. Arguing about who pays before anyone knows where water enters wastes months.
Scoping a Repair That Actually Ends the Leak
The moisture survey and the openings drive the decision between targeted repair, restoration, section replacement, and full condo roof replacement. Guessing at that decision is how buildings end up with a new roof that still leaks, because the failing condition was at the parapet or the wall, not in the field.
| Repair may be reasonable when… | Broader replacement may be appropriate when… |
|---|---|
| The failure is isolated and accessible | Similar failures occur across multiple buildings |
| Surrounding materials remain serviceable | The roof or envelope is near the end of its serviceable life |
| The source has been confirmed | Moisture is widespread within the assembly |
| The detail can be rebuilt correctly | Previous repairs have repeatedly failed |
| Deck and framing remain sound | Deck, framing, insulation, or interior materials are damaged |
A few principles hold regardless of scope:
- Correct the detail, not just the material. New flashing, correct laps and lap direction, proper tie-ins to walls and adjacent assemblies, and drainage corrections.
- Sequence the interfaces together. Roof, wall, window, and deck details meet at the same corners. Phasing them into disconnected projects is how new leaks get built into new work.
- Plan for the real cost drivers. On commercial and multifamily buildings, repair costs are driven by access, occupancy, and resident coordination, unknown deck conditions, code-triggered upgrades, and material lead times far more than by square footage alone.
- Account for difficult access. Swing stage, boom, or rope access on a mid-rise affects both schedule and cost, and it should be decided during preconstruction, not discovered at mobilization.
- Fold the work into reserves and CapEx planning. Aging buildings do better with a funded plan than with reactive emergency spending every storm season.
Questions to Ask Before Hiring a Roof Leak Contractor
Five questions separate a diagnostic contractor from a patching contractor:
1. How will you confirm the entry point before proposing a scope? 2. Will you water test, and what method and sequence will you use? 3. Will you open the assembly, and what will you document while it is open? 4. What is the warranty on the detail, not just on the material? 5. Who coordinates with the association’s engineer or consultant, and how are findings reported back to the board?
If the answers are vague, the proposal is a guess with a price on it. Preconstruction planning and consistent reporting are what keep a repair from becoming the next repeat leak. For additional contractor-selection guidance, review how to choose a reconstruction contractor for an HOA.
Recurring Roof Leak FAQs
Frequently asked questions
Why is my roof still leaking after it was repaired?
Why does my roof leak sometimes and not others?
Why is my roof leaking when it is not raining?
How long can I leave a leaking roof before it causes real damage?
My roof was just replaced, and it still leaks. What now?
Do I need a forensic engineer, a roofer, or a reconstruction contractor?
What documentation should an HOA keep for recurring roof leaks?
How long should a recurring roof leak remain unresolved?
Discuss Your Recurring Roof Leak and Repair Scope
If a leak has come back more than once on a building you manage or own, the useful next conversation is not about another patch. It is about investigative testing, a documented cost of repair, and a building envelope scope that corrects the condition causing it.
Shepperd Construction has spent more than eleven years doing this work in Texas, on commercial and multifamily buildings, alongside forensic engineers, property managers, and building owners. For a second read on a leak that will not stay fixed, discuss your recurring roof leak with Shepperd Construction to review what you already know and what still needs to be tested.
Written under the direction of Brett Grobarz, Vice President of Sales at Shepperd Construction. Brett brings more than 16 years of experience across the construction, development, and building envelope industries and holds a Master’s Degree in Architecture, with a background spanning both architectural design and construction execution.